Installation
Installing Tetsu OS means writing an image to a microSD card and adding the TETSU-DATA partition, where your games and saves live. Nothing is installed on the device itself: take the card out, and the stock firmware starts as before.
Check your memory type first
v0.1 starts only on units with LPDDR3 memory; later builds also start on LPDDR4. See Check your memory type. To test a build on an LPDDR4 unit, see Testing your device.
1. Download an image
Open the project's Releases page and download the card image of the newest release. Skip any marked Pre-release: those are test builds, for testing your device.
| File | What it is |
|---|---|
tetsu-rg35xxsp-<version>-sdcard.img.gz, such as tetsu-rg35xxsp-v0.1-sdcard.img.gz | The card image for a new install |
SHA256SUMS-rg35xxsp | Checksums, to check the download |
tetsu-rg35xxsp-<build>.img.gz, manifest.txt, manifest.sig | The signed update that SYSTEM UPDATE downloads. You don't need these to install |
tetsu-rg35xxsp-<version>-sources.tar.part*, -licences.csv | The sources of the GPL and other components, and their licences |
Check that the download is complete: with SHA256SUMS-rg35xxsp in the same folder,
sha256sum -c --ignore-missing SHA256SUMS-rg35xxspprints OK after the image's name.
2. Write the card
The image holds the boot partition and the system. TETSU-DATA comes after it, starting 4 GiB into the card, and fills the rest. The device adds it on its first start from the card, so any image writer will do. Because it lies past the image, writing a new image later leaves your games and saves where they are.
Option A: an image writer
Write the .img.gz with any card image writer, such as balenaEtcher or Raspberry Pi Imager ("Use custom"). Both read the .gz directly.
TETSU-DATA
An image writer only writes the image, so the card has no TETSU-DATA until the device's first start adds it, which takes about a second longer behind the logo. A card that had Tetsu OS before keeps its games and saves there. Anything else 4 GiB into the card is erased, as writing an image erases a card anyway. The card needs at least 6 GiB.
Option B: flash.sh on Linux
scripts/flash.sh writes the image and adds TETSU-DATA in one go, and refuses disks that look internal or are mounted. Unmount the card's partitions first, then:
scripts/flash.shlists the disks. Find your card by its size, then:
scripts/flash.sh /dev/sdXIt shows the card's partitions and asks before writing. Use --format-data to also erase the games and saves on TETSU-DATA:
scripts/flash.sh --format-data /dev/sdXCards from before the rename
A card flashed before 2026-11-08 has a data partition named RGDATA. It needs --format-data once; copy your saves off it first.
3. First boot
Put the card in the TF1 slot and press the power button. You'll see the Tetsu OS logo, then, with the boot jingle on, an animation of the kettle.
A new install starts with a short setup, one step per screen:
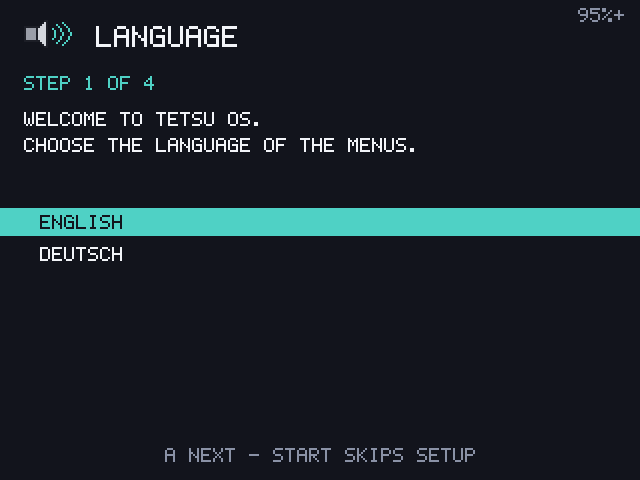
- Language: English or German. Up and Down switch at once.
- Wi-Fi: join a network, or skip. Network time sets the clock once connected.
- Time: your time zone and 12 or 24 hour clock. Choosing German preselects Berlin.
- Games: connect the USB cable to show TETSU-DATA as a drive on your computer, or send games over Wi-Fi from a browser. See Adding games.
A goes on, B goes back, and Start finishes from any step: everything here is also in Settings, and Settings > ADVANCED > RUN SETUP AGAIN repeats it.
Freedoom and Cave Story are copied to your games on the first start, so the home screen has something to play right away.
What's on the card
| Partition | Name | Size | Contents |
|---|---|---|---|
| 1 | TETSU-BOOT | 128 MiB, FAT | Boot logs, the bootloader's settings and a README. Readable on any computer |
| 2 | TETSU-ROOT | 1 GiB | System slot A, with the kernel |
| 3 | 1 GiB | System slot B, empty until the first update | |
| 4 | TETSU-DATA | the rest, FAT32 | Games, saves, covers, settings. See Files on TETSU-DATA |
Removing Tetsu OS
Take the card out. The device boots its stock firmware from its own card again. To reuse the card, copy what you want from TETSU-DATA and format it on your computer.